Do you want to enable calendar view in Projectopia? The calendar plays a vital role in our day to day life to prioritise our tasks and make them more productive. Using a calendar you can keep track of the deadlines, milestones you have achieved and your upcoming projects and meetings.
Projectopia – Project Management Plugin ensures that you will be able to spend the least time managing your task. This way you can invest more time in the task/project rather than its management.
Calendars can be used on different projects for project management. You can be able to see the schedule of a team for the upcoming days, weeks, months and years. This way you can track the project progress record and take the necessary actions accordingly. In the absence of a calendar in project tracking, you might not be able to manage, plan and monitor the effectiveness of the project in the long run.
No wonder there are multiple options for the calendar tools from the paper calendars on the desk and wall of the office to hundreds of calendar management tools. One of the most amazing calendars is the calendar view in Projectopia which saves you from headaches, hassles and missed deadlines.
Projectopia WordPress Plugin offers its users a full-fledged calendar that helps them keep track of all the ongoing projects, tasks, milestones, and due invoices.
We are sure by now you want to enable the Calendar view in the Projectopia plugin, but before beginning the step by step guide let’s know about Projectopia Plugin in detail.
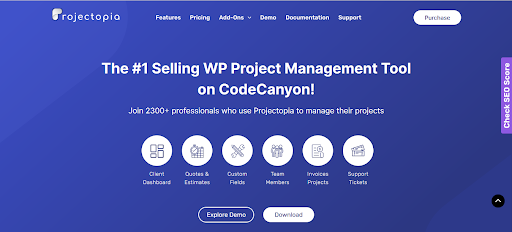
Projectopia is the best-selling WordPress Project Management Tool on CodeCanyon. This plugin will help you run your business and project in the best way possible by providing you with almost every tool that you need to have proper communication with your client and team members. It provides you with a bundle of premium add-ons to make sure that you don’t miss out on any necessary features.
Moreover, one of the best features is the calendar view in Projectopia. Using the calendar view you’ll be able to keep the track of your daily, weekly, monthly or yearly activities like completion of different tasks, milestones achieved in a certain period of time, invoices that are due and much more. Due to all these amazing features, it will be suitable and convenient to enable calendar view in the Projectopia plugin.
As we have already discussed the importance of calendar in project tracking and the benefits of the Projectopia plugin in the calendar view feature. Let’s begin the step by step guide to using the calendar view feature in Projectopia:
In order to use the calendar view feature in Projectopia, you need to make sure that you have Installed and Activated the Projectopia WordPress plugin. If you haven’t installed the plugin, make sure to install it!
Get Projectopia Plugin for yourself on the WordPress Repository or Official website. You can even download the plugin directly from the site Dashboard.
If you are a WordPress Beginner and you don’t know the right way to install the plugin, go through our article ‘How to Install New WordPress Plugin’
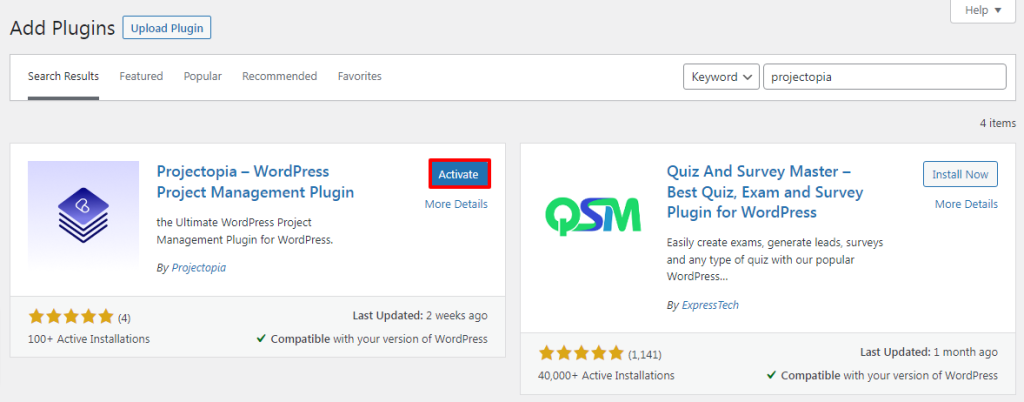
After installing the plugin make sure to Activate it.
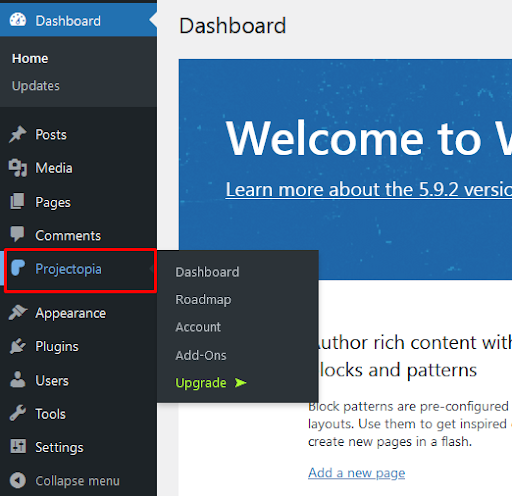
Once you activate the plugin, the Projectopia section will appear on the left sidebar of your WordPress dashboard.
This is the end of our first step to Install and Activate the Projectopia Plugin.
In order to enable the calendar view feature in Proejctopia, make sure to follow these steps:
This is the completion of our second step to enable a calendar view for projects in Projectopia.
This is the end of our tutorial guide on ‘How to Enable Calendar View for Project in Projectoia’ This feature enables you to spend the least time managing your task and perform tasks with much more effectiveness.
Also, you can get all the premium Projectopia Addons collections to make your project even more systematic. This bundle provides you with
If you can’t follow or don’t understand any of these steps to use and enable Expenses Addon in Projectopiamake sure to let me know about it in the comments section below. We would be happy to help you throughout. Also, do let us know what you think of this tutorial guide and the Expenses Add-On.
Also, Check-Out:
Projectopia – Project Management Plugin ensures that you will be able to spend the least time managing your task. This way you can invest more time in the task/project rather than its management.
Importance of Calendar in Project Tracking
Calendars can be used on different projects for project management. You can be able to see the schedule of a team for the upcoming days, weeks, months and years. This way you can track the project progress record and take the necessary actions accordingly. In the absence of a calendar in project tracking, you might not be able to manage, plan and monitor the effectiveness of the project in the long run.
No wonder there are multiple options for the calendar tools from the paper calendars on the desk and wall of the office to hundreds of calendar management tools. One of the most amazing calendars is the calendar view in Projectopia which saves you from headaches, hassles and missed deadlines.
Projectopia WordPress Plugin offers its users a full-fledged calendar that helps them keep track of all the ongoing projects, tasks, milestones, and due invoices.
We are sure by now you want to enable the Calendar view in the Projectopia plugin, but before beginning the step by step guide let’s know about Projectopia Plugin in detail.
Projectopia – Best Project Management Plugin for WordPress

Projectopia is the best-selling WordPress Project Management Tool on CodeCanyon. This plugin will help you run your business and project in the best way possible by providing you with almost every tool that you need to have proper communication with your client and team members. It provides you with a bundle of premium add-ons to make sure that you don’t miss out on any necessary features.
Moreover, one of the best features is the calendar view in Projectopia. Using the calendar view you’ll be able to keep the track of your daily, weekly, monthly or yearly activities like completion of different tasks, milestones achieved in a certain period of time, invoices that are due and much more. Due to all these amazing features, it will be suitable and convenient to enable calendar view in the Projectopia plugin.
Use Calendar View in Projectopia
As we have already discussed the importance of calendar in project tracking and the benefits of the Projectopia plugin in the calendar view feature. Let’s begin the step by step guide to using the calendar view feature in Projectopia:
Step 1: Install and Activate Projectopia
In order to use the calendar view feature in Projectopia, you need to make sure that you have Installed and Activated the Projectopia WordPress plugin. If you haven’t installed the plugin, make sure to install it!
Get Projectopia Plugin for yourself on the WordPress Repository or Official website. You can even download the plugin directly from the site Dashboard.
If you are a WordPress Beginner and you don’t know the right way to install the plugin, go through our article ‘How to Install New WordPress Plugin’
After installing the plugin make sure to Activate it.

Once you activate the plugin, the Projectopia section will appear on the left sidebar of your WordPress dashboard.

This is the end of our first step to Install and Activate the Projectopia Plugin.
Step 2: Enable Calendar View in Projectopia
In order to enable the calendar view feature in Proejctopia, make sure to follow these steps:
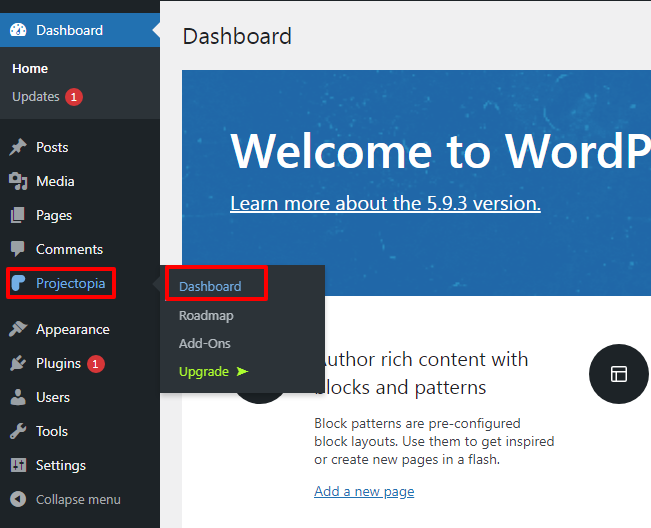
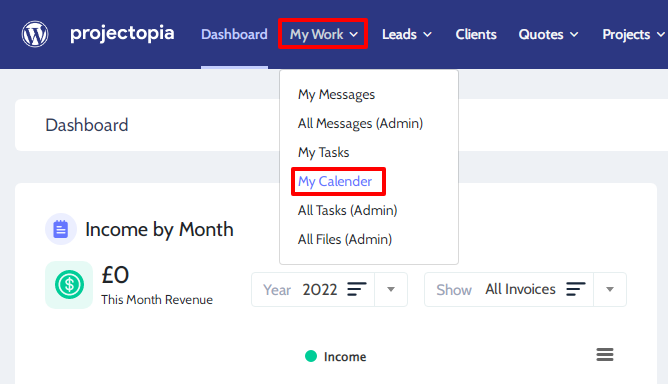
- Go to Projectopia>>Dashboard.

- Then select My Work>>My Calendar.

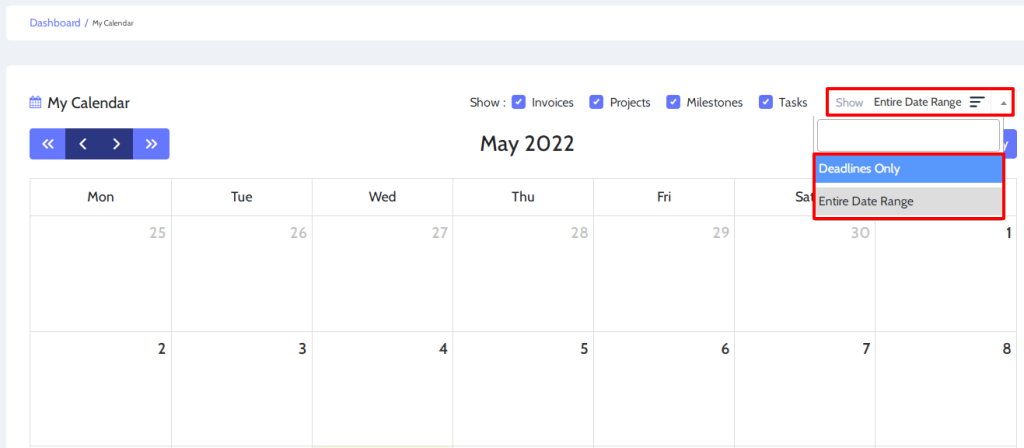
- You can choose to show the Deadlines Only or Entire Date Range as per your own requirement.

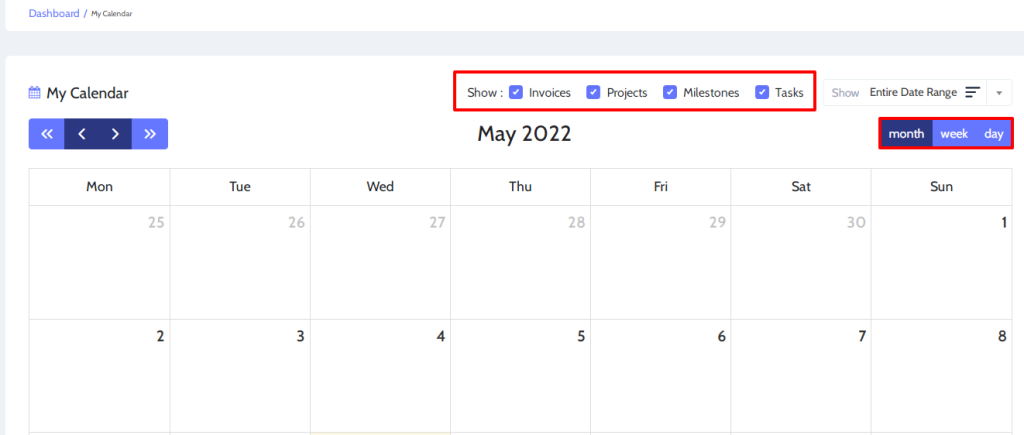
- Similarly, select the month, week and day.
- Tick the button next to Invoices, Projects, Milestones and Task in order to show its Deadlines and Entire Date Range.
- If you don’t want to enable any of the Invoices, Projects, Milestones and Tasks features, make sure to leave the box button empty.

This is the completion of our second step to enable a calendar view for projects in Projectopia.
Conclusion:
This is the end of our tutorial guide on ‘How to Enable Calendar View for Project in Projectoia’ This feature enables you to spend the least time managing your task and perform tasks with much more effectiveness.
Also, you can get all the premium Projectopia Addons collections to make your project even more systematic. This bundle provides you with
- Projectopia Kaban Board Add-On
- Projectopia Roles & Permissions Add-On
- Projefctopia Support Tickets Add-On
- Projectopia Time Entries Add-On
- Projectopia 2Checkout Add-On
- Projectopia Subscriptions Add-On
- Projectopia Bug Tracker Add-On
- Projectopia WooCommerce Add-On
- Projectopia Custom Fields Add-On
- Projectopia Expenses Add-On
- Projectopia Twilio Add-On
- Projectopia Reporting Add-On
If you can’t follow or don’t understand any of these steps to use and enable Expenses Addon in Projectopiamake sure to let me know about it in the comments section below. We would be happy to help you throughout. Also, do let us know what you think of this tutorial guide and the Expenses Add-On.
Also, Check-Out:
